A complete guide to coil vases, coil pots, coil ceramics, and clay coil building for pottery artists of every level
Coil building is one of the oldest ceramic techniques in the world, dating back thousands of years across cultures—from Native American coil pots to African water vessels to ancient Greek amphorae. Today, artists still use this hand-building method because coil pottery allows forms the wheel cannot easily replicate: dramatic curves, organic silhouettes, sculptural asymmetry, and surface texture that proudly shows the maker’s hand.
A coil vase is more than a container. It’s a vessel with character. Smooth or raw, symmetrical or wild, minimal or richly patterned—the story lives in the coils.
This guide will show you how to build a coil vase step by step, using foundational hand-building skills suited for beginners, intermediate ceramicists, and advanced builders wanting precision, creativity, or experimental form. You will learn how to prepare clay coils, build walls evenly, control shape, refine surfaces, and dry your vessel properly for firing. Beyond the basic instructions, we will cover decorative coil techniques, exposed-coil finishes, glaze considerations, firing tips, and alternative coil projects to try next.
Whether your goal is a smooth coil vase polished like stone or an expressive, sculptural vessel that celebrates touch and movement—this tutorial will take you through the build with clarity and artistic depth.
Materials + Tools Checklist
| Required Tools | Optional Enhancements |
|---|---|
| Clay (stoneware or earthenware) | Dirty Girls bevel tool |
| Sherrill wire tool | Texture ribs + pattern rollers |
| Work surface / canvas board | Colored slips + engobes |
| Metal rib | Loop/sgraffito carving tools |
| Paddle | Banding wheel / turntable |
| Xiem knife or carving blade | Rubber ribs for burnishing |
| Fang scratching tool for scoring | Glaze for final finishing |
| Thin plastic for moisture control | Oxides for surface accents |

Step 1: Preparing Your Clay
Start by cutting four thick rectangles of clay from your bag using your Sherrill wire tool. Soften the edges and gently stretch each piece by squeezing and turning it in your hands until it begins to form a chunky, rounded coil.
The clay at this stage should still hold body, not sticky or overly wet. If you're planning a taller coil vase or coil vessel, prepare extra clay blocks now—larger work requires many more coils than beginners estimate. Wedge clay briefly to remove air pockets and align platelets. This prevents internal cracks during the dry and firing stage.
Types of clay suitable for coil vases:
| Clay Type | Features | Best For |
|---|---|---|
| Stoneware | Durable, good plasticity | Coil pottery, tall vessels |
| Earthenware | Softer, lower fire | Beginner coil projects |
| Porcelain | Strong but unforgiving | Advanced smooth coil vases |
| Grogged clay | Sand-textured, supports height | Sculptural exposed coil pottery |

Step 2: Rolling Your Coils
Place the clay on your work table. With both hands flat above the coil and thumbs touching, gently roll the clay forward as you slowly move your hands apart. When your hands reach the ends, bring them back together and roll toward yourself.
Repeat this back-and-forth motion until the coil is smooth and even. Let the coil make full rotations under your hands so it stays round and doesn’t flatten out.
Keep going until you have enough coils for your project—you’ll use them to build the different sections of your vase.
Additional expert coil-rolling tips:
• Keep your pressure even—thin spots become weak walls
• If coils crack, mist lightly and knead to re-hydrate
• For tall coil pots, aim for coil thickness of ½–¾ inch
• For small coil bowl projects, thinner coils reduce bulk
Beginners often roll too fast. Slow hands = consistent coils.

Step 3: Building the Base Forms
A Brent Plasti-Bat works great as your foundation—it keeps your shapes consistent and easy to join later.
Start by laying a coil around the edge of the bat. When the ends overlap, blend them together with your thumb.
To make a dome or cone shape, smooth the inside edge of the coil first.
For an open bowl shape, blend the outside edge first.
For straight forms, it’s usually best to blend the inner edge—pushing outward is easier than pulling in.
After a few layers, begin smoothing both sides and even out the wall thickness. A metal rib works perfectly for this step. Keep adding coils and blending until your form takes shape.

Pro development advice:
• Compress every coil firmly—compression builds structural strength
• Use a banding wheel so you can rotate while working
• Pause occasionally, measure wall thickness with a needle tool
• Consistency now prevents collapse later in drying
If you wish to create a sculptural coil vase rather than a symmetrical one, vary coil placement intentionally to form shifting curves.
Step 4: Letting the Clay Rest
Patience is key! Give your forms a little time to stiffen before you build higher. This helps them hold their shape and prevents sagging or collapse.
To keep moisture levels even, wrap the top coil in a strip of thin plastic while the lower part firms up. You’ll know it’s ready when it feels leather-hard but still pliable enough to join.
Clay memory settles as it rests. Skipping this stage causes warping or leaning walls later. Check every 20–45 minutes depending on studio humidity. In very dry climates, tent the entire form loosely to slow evaporation. Uneven moisture = cracking risk.

Step 5: Making the Vase Sections
For this project, we’re combining three parts:
Two dome shapes made on Plasti-Bats
One smaller cylinder that opens into a bowl (this becomes the base)
Use your paddle, metal rib, and Sherrill rib to refine each form. Take your time—this is where your vase’s personality starts to emerge.

Additional considerations:
• Taller vases need thicker lower coils to support weight
• Symmetry lovers should rotate continuously while refining
• Sculptural coil vessels benefit from gentle asymmetry
• Add decorative coils on top for texture or functional grip
At this stage, you can choose creative directions:
| Style Choice | Description |
|---|---|
| Smooth coil vase | Completely blended walls polished with rubber rib |
| Exposed coil vase | Coils intentionally visible as design feature |
| Hybrid form | Some areas smooth, others textured for contrast |
| Sculptural coil vessel | Extended neck, altered body, organic sway |
No two coil pots ever look alike—and that is the beauty.
Step 6: Attaching the Forms
When the pieces are strong enough to handle, it’s time to join them.
Use your Xiem carving knife and Fang scratching tool to score the areas that will connect.

Then, with a small paintbrush, apply just a bit of water to those scored sections. Press the forms together and gently paddle them to secure the seam.
Bonus technique: Slip works stronger than plain water. You can mix clay slurry to use as joining slip for long-term durability, especially for coil vases intended for functional use like holding flowers or water.

Step 7: Blending and Refining
Blend the seams carefully using your ribs and a little patience. Work gradually so you don’t distort the shape.
If you notice any uneven spots, lightly score them and add small bits of clay to even things out. Once the vase feels stable, use your ribs to refine the surface and remove any marks or lumps.
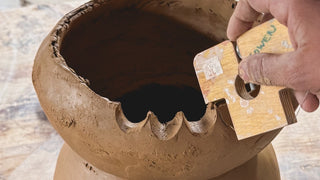
Pay attention to the little details—the bottom, the rim, and the subtle curves all make a difference. For a stylish touch, we used a Dirty Girls bevel tool to create a shaped rim.
Extra refinement options:
• Burnish with a spoon for soft sheen
• Add slip decorating before bisque firing
• Carve repeating patterns for visual movement
• Use rope impressions, stamps, leaf textures
Surface work defines identity. Minimal or maximal—both are valid.

Step 8: Final Shaping and Surface Work
Once the form is complete, you can use a paddle to gently adjust proportions and firm up the walls.
Try experimenting with surface texture using different ribs or pattern tools. This is where you can make the vase uniquely yours.
Additional surface possibilities:
| Technique | Result |
|---|---|
| Slip trailing | Raised decorative lines |
| Engobe brushing | Matte painterly surface |
| Underglaze patterns | Illustration + color |
| Oxide wash | Shadowing + antique effect |
| Mishima carving | Fine linework inlay |
Finish choices shift the entire feeling of the ceramic coil vase.

Step 9: Drying Your Vase
Congratulations—you’ve built your coil-made vase!
Now, cover it loosely in plastic so it can dry slowly and evenly. Coil-built pieces take their time to dry, so check on it regularly. You can unwrap it for short periods while you’re in the studio to help air circulate.
Keep an eye on thicker areas or seam connections—those are the spots most likely to crack if they dry too fast.
When bone-dry, the piece can be bisque-fired (cone 04 is common). After bisque, glaze for final vitrification. For sculptural coil vessels, matte glazes highlight form while glossy finishes emphasize light and curve.
Additional Coil Pottery Projects to Try Next
(After mastering this coil vase)
• Coil bowl with wide flared rim
• Coil mug with added handle
• Tall cylinder coil vessel with carved banding
• Sculptural coil pot using varied thickness coils
• Multi-neck coil vase inspired by traditional pottery
Troubleshooting Chart
| Problem | Cause | Fix |
|---|---|---|
| Vase collapsing while building | Too wet; no rest time | Pause, let clay firm to leather-hard |
| Cracks forming when drying | Uneven moisture | Tent loosely with plastic, dry slower |
| Weak joints | Poor scoring or no compression | Deep score lines + slip join + paddle |
| Uneven walls | Coils inconsistent thickness | Slow down rolling; measure frequently |
Coil building is more than just a technique—it’s a rhythm. Every roll, blend, and touch of the rib adds your fingerprint to the clay’s memory. Be patient with yourself and the material. Clay teaches you balance, flexibility, and how to move with the process instead of rushing it.
Whether your vase comes out perfectly smooth or proudly textured, it’s proof that your hands made something lasting. That’s the real success here—each coil a small act of faith in your own creative hands.